This post has been moved to:

Thursday, December 29, 2011

Thursday, December 22, 2011
Wednesday, December 14, 2011
this took longer than I thought!
In my head I've finished posting about little Em's birthday party and I'm already on to Christmas decor!!
I'm horrible!
But I just wanted to show you a few more simple DIY ideas that I loved and made for a beautiful CHEAP party!


What you will need:
Tissue paper
Ribbon
Patterned edged scissors (or regular scissors)
Hot glue
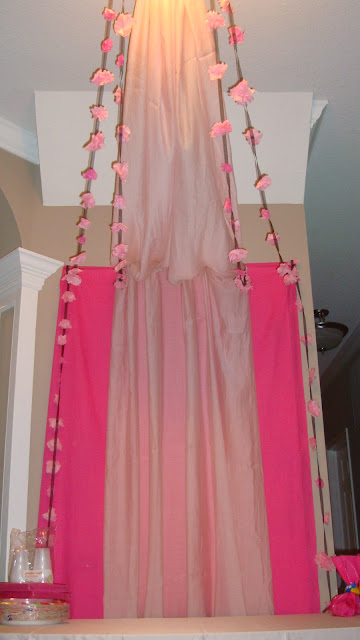
1. Cut little squares of tissue paper using the patterned edged scissors or using regular scissors, cutting a pattern so that its not straight lines.
2. Layer three or four on top of each other and twist the bottom
3. Hot glue it to the ribbon!
4. Repeat! Space them out as much as you would like.
I'm still smiling about the instructions for that! Seriously, four steps! (well, actually three..Does "repeat" actually count as a step??) That's not the point. The point is: You can spend SO much less money (none at all if you have the stuff around your house) and make your party look SO much cuter too! :-)
I've seen inspirational pictures on the web of how some photographers were sitting the birthday girl on the beautifully arranged dessert table! I loved the idea! Im sure you would agree...


The #1 is another idea I had that took me about five minutes to make!
I made it out of cardboard from a diapers box! Just gather the tissue paper and glue to the backside! I can picture it being made with scrap material and some embellishments as well!
I'm going to have to wait a whole year to try another version!
 A happy birthday girl! :) and I'm happy with the way everything turned out.
Can't wait to show you all that I've been working on for DIY Christmas decor! I'm so excited!
I'm horrible!
But I just wanted to show you a few more simple DIY ideas that I loved and made for a beautiful CHEAP party!


Adorable RIGHT??? :-)
Well, I can't take FULL credit since my sister actually made it- I wish I had a tutorial to show you! But I did beat the instructions out of her (just kidding of course) and I'm super excited because of how simple it is! Anyone can do it, and SHOULD DO IT for their next party! I can picture it used for a baby shower or a bridal shower! The possibilities are endless, really! Best part is- you can reuse them and give them to others to borrow! Just like my sis- Thanks a bunch: It made the party.What you will need:
Tissue paper
Ribbon
Patterned edged scissors (or regular scissors)
Hot glue
1. Cut little squares of tissue paper using the patterned edged scissors or using regular scissors, cutting a pattern so that its not straight lines.
2. Layer three or four on top of each other and twist the bottom
3. Hot glue it to the ribbon!
4. Repeat! Space them out as much as you would like.
I'm still smiling about the instructions for that! Seriously, four steps! (well, actually three..Does "repeat" actually count as a step??) That's not the point. The point is: You can spend SO much less money (none at all if you have the stuff around your house) and make your party look SO much cuter too! :-)
I've seen inspirational pictures on the web of how some photographers were sitting the birthday girl on the beautifully arranged dessert table! I loved the idea! Im sure you would agree...
 |
| Via unknown |
My version was without the dessert since I knew my model was a little less cooperative! :-)


The #1 is another idea I had that took me about five minutes to make!
I made it out of cardboard from a diapers box! Just gather the tissue paper and glue to the backside! I can picture it being made with scrap material and some embellishments as well!
I'm going to have to wait a whole year to try another version!

Can't wait to show you all that I've been working on for DIY Christmas decor! I'm so excited!
Monday, December 5, 2011
the perfect way to start a blog
I think that I have put this off long enough!
What was i waiting for? My love for DIY and fashion and interior design and cooking should have been enough! My old love for writing should have put me over the edge...
But I guess I was scared? More like nervous...
But here it is!
MY FIRST POST
Im just so happy to finally realize (with my husband's help) that no day is better than today to start something :)
This weekend we celebrated our little girl's 1st birthday party!
One year that flew by so fast.. I cant believe that our little Em is a year old. She is now a big ONE year old.. walking, talking, and playing games.
And I just really want to say...
I'm SO BLESSED.
To have known my little girl for a year ...
To have carried her for one day short of 9 months
And to be her mother.
I pray she grows up with a heart as beautiful as she is.
I made SUPER simple silly bracelets for the kids as favors at her birthday party. I didn't make a tutorial because like I said- they are Simple! They are made with felt- easily accessible and so cheap!
 | |
| the middle flower was made using this tutorial! : http://shadandlizzie.blogspot.com/2010/08/felt-flower-headband-tutorial.html |

 |
| The football for my son! |

 |
| Me being a horrible hand model.. not as easy as it looks! ;-) |
All I did to make a bracelet was cut out cute shapes, hot glue them to the center, hot glue Velcro to one side of the strap and to the back side of the other strap and THAT'S ALL! (Just make one strip of Velcro longer so that the guest can adjust the size to fit their wrist!)
Its also great for both boys and girls! Since we had both at the party, I made a football and a few other "boy" shapes :)
Its also great for both boys and girls! Since we had both at the party, I made a football and a few other "boy" shapes :)
I hope this inspired you to make some for your next party or as a fun craft with your kiddos!
To Be Posted: more DIY and pics from the birthday party!
Subscribe to:
Posts (Atom)