This post has been moved to:

Showing posts with label Outfits. Show all posts
Showing posts with label Outfits. Show all posts
Thursday, October 17, 2013

Monday, September 23, 2013
Monday, September 9, 2013
Friday, August 16, 2013
Sunday, August 4, 2013
Tuesday, March 19, 2013
Monday, March 11, 2013
Wednesday, January 30, 2013
Thursday, January 17, 2013
Monday, December 10, 2012
Monday, December 3, 2012
Tuesday, November 13, 2012
The Detachable Leather Bow Belt Tutorial
Hi! I am so happy to be writing- you have no idea! Its been almost a month since I last posted! That thought makes me cringe and feel anxiety so lets not mention it again? :)
It must be the time change and how fast it gets dark! The shorter day makes me feel like I have less time in the day and that leads to feeling like the day slipped from my fingers again. I hope you are not experiencing this as well. If you are, I'd feel better. ;)

Have you noticed all the bows around lately? I actually think the bow never went away. It's the touch of girlishness to a classic outfit and the mixing hard with soft that never goes out of style. I contemplated purchasing one (more like wishing for this one!) but I could never justify purchasing a belt. Even in the discounted stores like Marshalls, I would rather buy a new top instead. Are you like that too?
Anyways, it's been some time that an idea has been floating in my head and I finally got to complete it. I've gotta say- I'm pleased! This is probably one of my cheapest projects to date! I expect looks of complete confusion while reading this post and even hear you repeatedly say "She cannot be serious". But I believe that, except for the ones that read this post, no one will ever know how cheap it really is. ;)
What you need:
Two belts, same color (I used one that was brown but black on the other side. (Check out a thrift store! Our Goodwill sells belts for around $1.00 and our local thrift store has them at $0.50!)
Hammer
Stapler
Paper Clip (Big)
Scissors
Leather Hole Punch or Jewelry Hole Punch (or some sort of skinny sharp tool to pierce a hole)
(I didn't get the tool for leather but a cheaper one. Either way, if you grab one at Michael's, make sure to use your Smartphone coupon 50% off one regular priced item! Turns out not so bad. I also found this one at a good price if you like shopping online. I've got more belt remakes ahead!)
1. On the belt that will become the bow, cut off the buckle and the other end right after the last hole. (the hoarder in me will keep this buckle with no earthly clue what to do with it!)
 2. Play with it- decide how big you want the bow to be and how long the tails. Cut accordingly.
 3. When you've found the perfect shape, make a hole through all three layers. (you might have to do each layer separately depending on which tool you are using)

4. Unbend the paperclip and put it in the hole to secure it. Bend it around and bang on it with a hammer to make it tight and to securely hold the bends in place. This can (of course) be done using rivets and eyelettes and look very professional! I purchased the wrong size and this is my "make it work" moment! It worked :) Worry not- this will not be seen.
 5. Cut a piece from your scrapped leather that will fit around the bow and have extra in the back to overlap a little.

6. Staple the flaps together (in the back) on two sides, making sure to leave it unattached to the bow so you can slide your other belt through. This could possibly done with leather glue as well?
 7. It's done!! Slip onto your belt after you've thread it through the first part of the buckle. (See pictures below)


 I'm sure this will work with a couple of different types of belt buckles. The bow should be able to hide a smaller buckle. It's also removable so no need to let go of your favorite belt for this reason! This would look gorgeous in a tan leather color. I was searching but couldn't find two browns that were identical in the thrift store! I gave up and did a black version. I hope to make another one soon! The options are kinda endless!
Tip: buy the two belts at the same time or bring your existing belt that you want to use with you. That is the best way to assure you have a match! Otherwise you will end up with a bag full of belts.. like me. :) If that happens anyway than check back soon. I have more ideas of what to do with them!!
P.S. Just to brag a little about our thrift store- I had about three belts that I was unsure of because of the color and I decided last minute to put them back. She gave me all of them for the price of one. So, to sum up: three belts for $0.50. This project came to about $1.33. :) I wish the same success on you.
Thanks so much for reading! I'd love to know if your going to try this!
It must be the time change and how fast it gets dark! The shorter day makes me feel like I have less time in the day and that leads to feeling like the day slipped from my fingers again. I hope you are not experiencing this as well. If you are, I'd feel better. ;)

Have you noticed all the bows around lately? I actually think the bow never went away. It's the touch of girlishness to a classic outfit and the mixing hard with soft that never goes out of style. I contemplated purchasing one (more like wishing for this one!) but I could never justify purchasing a belt. Even in the discounted stores like Marshalls, I would rather buy a new top instead. Are you like that too?
Anyways, it's been some time that an idea has been floating in my head and I finally got to complete it. I've gotta say- I'm pleased! This is probably one of my cheapest projects to date! I expect looks of complete confusion while reading this post and even hear you repeatedly say "She cannot be serious". But I believe that, except for the ones that read this post, no one will ever know how cheap it really is. ;)
What you need:
Two belts, same color (I used one that was brown but black on the other side. (Check out a thrift store! Our Goodwill sells belts for around $1.00 and our local thrift store has them at $0.50!)
Hammer
Stapler
Paper Clip (Big)
Scissors
Leather Hole Punch or Jewelry Hole Punch (or some sort of skinny sharp tool to pierce a hole)
(I didn't get the tool for leather but a cheaper one. Either way, if you grab one at Michael's, make sure to use your Smartphone coupon 50% off one regular priced item! Turns out not so bad. I also found this one at a good price if you like shopping online. I've got more belt remakes ahead!)
1. On the belt that will become the bow, cut off the buckle and the other end right after the last hole. (the hoarder in me will keep this buckle with no earthly clue what to do with it!)


4. Unbend the paperclip and put it in the hole to secure it. Bend it around and bang on it with a hammer to make it tight and to securely hold the bends in place. This can (of course) be done using rivets and eyelettes and look very professional! I purchased the wrong size and this is my "make it work" moment! It worked :) Worry not- this will not be seen.


6. Staple the flaps together (in the back) on two sides, making sure to leave it unattached to the bow so you can slide your other belt through. This could possibly done with leather glue as well?


Tip: buy the two belts at the same time or bring your existing belt that you want to use with you. That is the best way to assure you have a match! Otherwise you will end up with a bag full of belts.. like me. :) If that happens anyway than check back soon. I have more ideas of what to do with them!!
P.S. Just to brag a little about our thrift store- I had about three belts that I was unsure of because of the color and I decided last minute to put them back. She gave me all of them for the price of one. So, to sum up: three belts for $0.50. This project came to about $1.33. :) I wish the same success on you.
Thanks so much for reading! I'd love to know if your going to try this!
Thursday, October 18, 2012
DIY Cascade High-Low Maxi Skirt
Hello to you!
These past few weeks have just flew by and I can't believe it's October already! It's cold - MUCH colder than its supposed to be. But I'm determined to embrace this fall season and enjoy the sweater weather while it lasts (even though some days are already coat weather). At least until I feel like pulling out my wools coats!

I found this print fabric (at Walmart!) and fell in love. To be honest, I don't usually wear maxi skirts. I'm tall and they make me feel like a giant! But at $2.00 a yard, I thought I'd try and make a maxi skirt before buying one and never wearing it..
For those of you who think a maxi skirt if JUST for summer, this post is for you. I love a maxi skirt in the summer. It's very carefree elegance. It's almost made for summer. But when I wore it for this post, it screamed fall to me! Do you agree? I would love to hear your thoughts...
This is a super easy tutorial. My proof? I made this the day before my sister's baby shower, when I realized I didn't go shopping for something to wear!
Materials:
2 Yards (less/more depending on size and how much "ruffle" you want on side)
Elastic Band
Take the material and wrap it around you, having the exact center at one hip and all the left over on the other side. Mark that spot on both pieces of fabric of what fits your waist. (With a pin line inside or with 2 safety pins) This picture best explains what I'm trying to say:
 Flip the material over to back side and fold down the top edge enough to fit the elastic.
(see below picture- measure, than pin)
Sew along the pins, removing as you go and you only need to do this until the marked spots.
 Next measure the elastic (loosely around your waist) and thread through your loop that you have made. (I use a safety pin, or sometimes a paper clip through a hole I make) :)


Pin and sew down the marked line you had made. (The one that shows the size of your waist). The interesting part is that it doesn't need to be all the way down. I did literally an inch- the width of the gap I had for the elastic.

 Don't worry about how this part will look- you won't see it when you have it on.
Flip it inside out again.
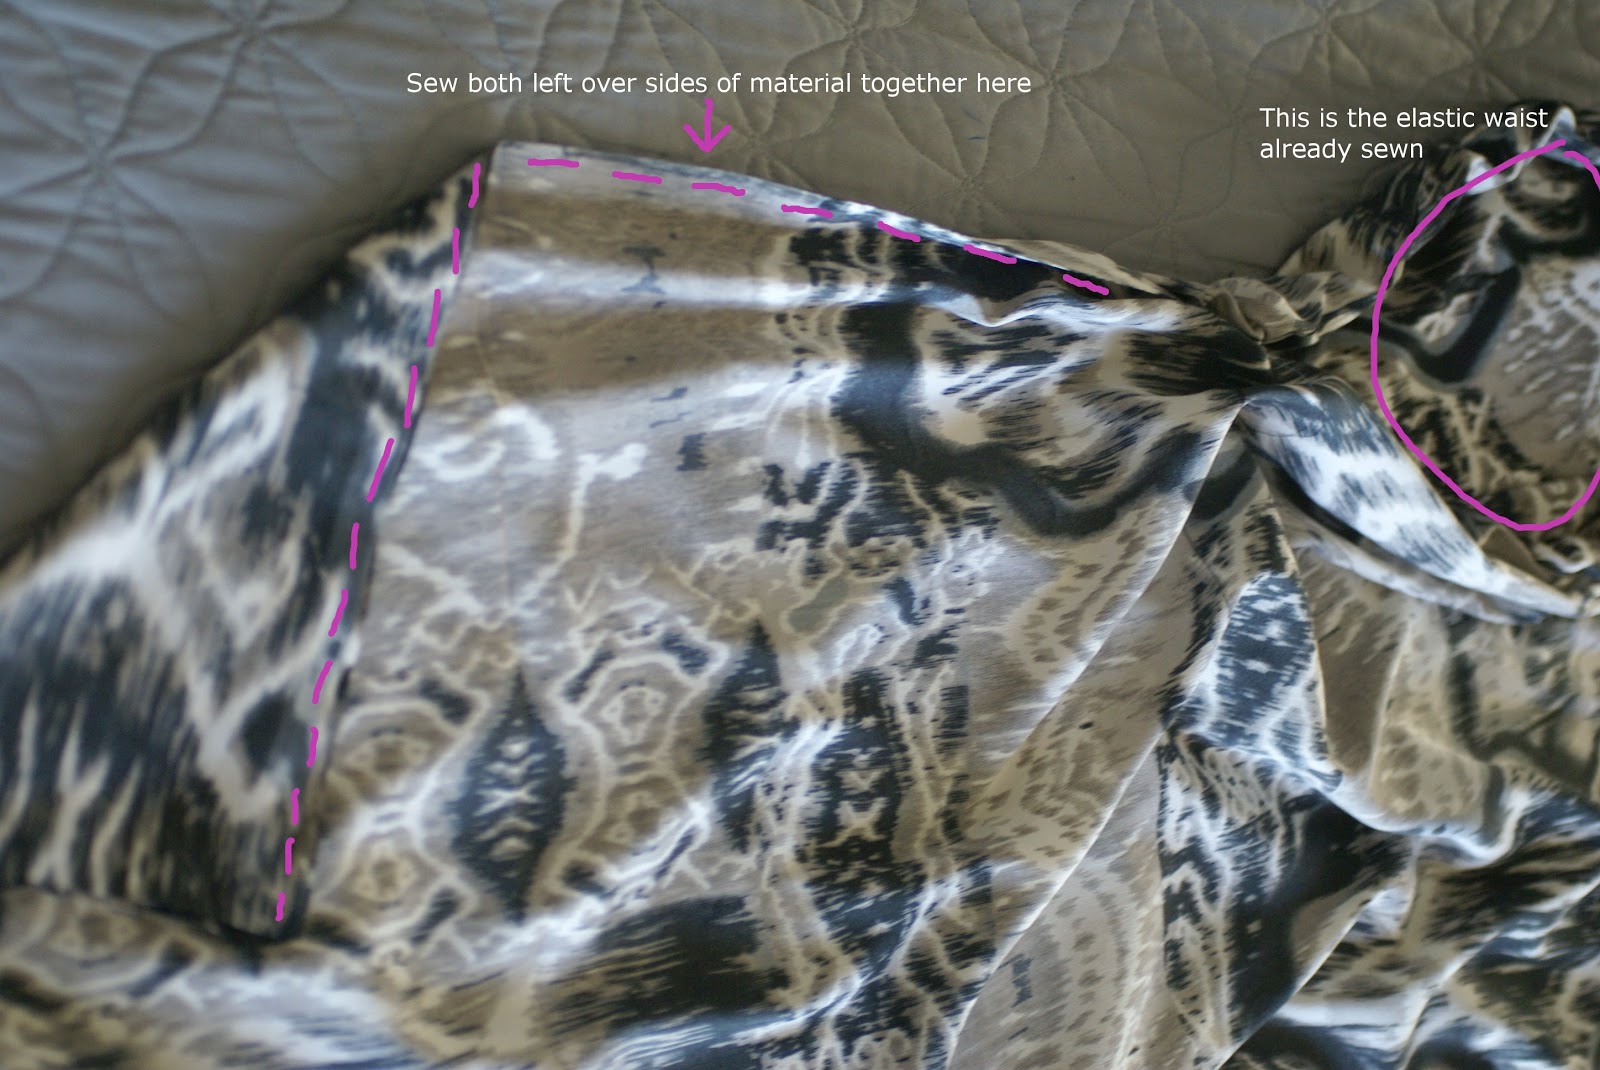
Pin and sew across the top of the left over material. I don't know how but it just works...
 This looks a lot harder because of the print (and may be confusing?) but that's it! Flip back right side out and slip on. The last sew prevents you from having a huge slit and also creates a cascade ruffle down the side! Somehow it just works.
 Another plus about this fabric- no hemming! :) This material's length was good on me so I didn't need to shorten it at all but you might want to hem or trim the bottom.
(You can adjust how high/low you want the slit to be. With this pattern and my size, the slit goes to about my knee. If you want it higher, just cut off the excess a little more and you'll have less to sew at the end creating a higher slit. Vis versa- if you want the slit longer, buy a little extra fabric)


These past few weeks have just flew by and I can't believe it's October already! It's cold - MUCH colder than its supposed to be. But I'm determined to embrace this fall season and enjoy the sweater weather while it lasts (even though some days are already coat weather). At least until I feel like pulling out my wools coats!

I found this print fabric (at Walmart!) and fell in love. To be honest, I don't usually wear maxi skirts. I'm tall and they make me feel like a giant! But at $2.00 a yard, I thought I'd try and make a maxi skirt before buying one and never wearing it..
For those of you who think a maxi skirt if JUST for summer, this post is for you. I love a maxi skirt in the summer. It's very carefree elegance. It's almost made for summer. But when I wore it for this post, it screamed fall to me! Do you agree? I would love to hear your thoughts...
This is a super easy tutorial. My proof? I made this the day before my sister's baby shower, when I realized I didn't go shopping for something to wear!
Materials:
2 Yards (less/more depending on size and how much "ruffle" you want on side)
Elastic Band
Take the material and wrap it around you, having the exact center at one hip and all the left over on the other side. Mark that spot on both pieces of fabric of what fits your waist. (With a pin line inside or with 2 safety pins) This picture best explains what I'm trying to say:
 \
\
(see below picture- measure, than pin)
Sew along the pins, removing as you go and you only need to do this until the marked spots.


(I've marked my waist size with a pen line and than pinned it)
Slip on the skirt (in its very weird condition) and measure the elastic as tight as you will want the waistband. Sitting higher on your waist or at your hips? Mark that spot again. Slip off and sew the elastic ends together. Cut off excess.

Pin and sew down the marked line you had made. (The one that shows the size of your waist). The interesting part is that it doesn't need to be all the way down. I did literally an inch- the width of the gap I had for the elastic.


Flip it inside out again.
Pin and sew across the top of the left over material. I don't know how but it just works...

(You can adjust how high/low you want the slit to be. With this pattern and my size, the slit goes to about my knee. If you want it higher, just cut off the excess a little more and you'll have less to sew at the end creating a higher slit. Vis versa- if you want the slit longer, buy a little extra fabric)


If you have any questions, please comment and I'll get back to you! Thanks for reading!
Saturday, September 15, 2012
Thursday, August 30, 2012
Tuesday, August 7, 2012
Monday, March 12, 2012
Subscribe to:
Comments (Atom)